Re: управление драйвером жк lc75823
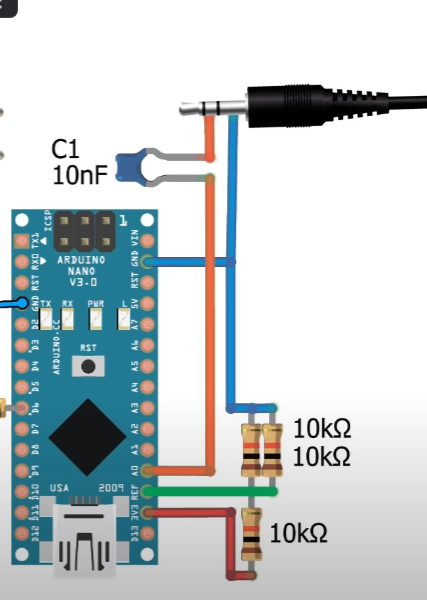
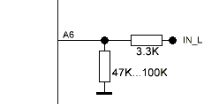
как правильно подключить анализатор спектра? Такой вариант как на схеме сгодится?
Вы не вошли. Пожалуйста, войдите или зарегистрируйтесь.
forum.rcl-radio.ru → Примеры кода → управление драйвером жк lc75823
как правильно подключить анализатор спектра? Такой вариант как на схеме сгодится?

Мой код на стадии завершения. Осталось лишь одно, сделать радио на модуле RDA5807m. Можете ли вы написать код для управления им с помощью энкодера(нужны 2 функции подстройка частоты энкодером, а при нажатии кнопки энкодера листались с первой те волны, частоты которых выставляются в скетче. А когда сохранённые волны кончились он переходил опять на 1,и так по кругу.) Регулировка громкости не нужна, её можно поставить на 15. Сохранение подобранной волны удержанием кнопки мне не нужно.
скетч нужен новый, в свой я его встрою сам. А сохраненные волны должны выглядеть так
RADIO_FREQ preset[] = {8750,8830,8910,8950,9120,9160,9360,9520,9800,9960,10120,10210,10370,10570};через сколько примерно по времени будет готов скетч?
Нет гарантий то будет работать, но должно.
Условие radio_on_off == 1 должно быть выполнено, то бы работало радио. Добавить кнопку которое бы меняло условие radio_on_off == 0 на radio_on_off == 1 и наоборот.
#include <Wire.h>
#define CLK    8 // CLK ENCODER
#define DT     7 // DT  ENCODER
#define SW     6 // SW  ENCODER

#include <radio.h>
#include <RDA5807M.h>
#include <Encoder.h>
#include <MsTimer2.h>

#define FIX_BAND    RADIO_BAND_FM
RDA5807M radio;
Encoder myEnc(CLK, DT);

long times,oldPosition  = -999,newPosition;
int k[14]= {8750,8830,8910,8950,9120,9160,9360,9520,9800,9960,10120,10210,10370,10570};
bool radio_on_off=1;
bool start=0;
int i_radio, f_radio;

void setup() {
  MsTimer2::set(1, to_Timer);MsTimer2::start();
  radio.init();
  radio.debugEnable();
  radio.setVolume(15);
  radio.setMono(false);// true - MONO
  radio.setMute(0);
  f_radio = k[0];
  delay(100);
}

void loop(){
  if(radio_on_off==1){
   if(digitalRead(SW)==0){i_radio++;if(i_radio>13){i_radio=0;}start=1;f_radio = k[i_radio]; delay(200);}


   if (newPosition != oldPosition){oldPosition = newPosition;if(newPosition>1){newPosition=1;}if(newPosition<-1){newPosition=-1;}
     start=1; f_radio=f_radio+newPosition*10;newPosition=0;start=1;}

   if(start==1){radio.setBandFrequency(FIX_BAND, f_radio);delay(100);start=0;}
  }
  }

void to_Timer(){newPosition = myEnc.read()/4;}какая переменная отвечает за частоты(что бы на дисплей вывести)?
что то не работает, выводил много чего в порт, но безуспешно, там тишина
В setup перед delay(100) вставьте строчку
radio.setBandFrequency(FIX_BAND, 10370);
Должно заработать радио
Если не заработает то delay(100) замените на
delay(200)
потом на
delay(300)
потом на
delay(400)
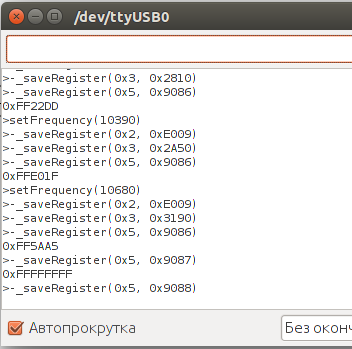
Должно быть примерно следующее

Можете скинуть. Весь код, что бы я скопировал
#include <Wire.h>
#define CLK    8 // CLK ENCODER
#define DT     7 // DT  ENCODER
#define SW     6 // SW  ENCODER

#include <radio.h>
#include <RDA5807M.h>
#include <Encoder.h>
#include <MsTimer2.h>

#define FIX_BAND    RADIO_BAND_FM
RDA5807M radio;
Encoder myEnc(CLK, DT);

long times,oldPosition  = -999,newPosition;
int k[14]= {8750,8830,8910,8950,9120,9160,9360,9520,9800,9960,10120,10210,10370,10570};
bool radio_on_off=1;
bool start=0;
int i_radio, f_radio;

void setup() {
  Serial.begin(9600);
  Wire.begin();
  MsTimer2::set(1, to_Timer);MsTimer2::start();
  radio.init();
  radio.debugEnable();
  radio.setVolume(15);
  radio.setMono(false);// true - MONO
  radio.setMute(0);
  f_radio = k[0];
  radio.setBandFrequency(FIX_BAND, 10370);
  delay(400);
}

void loop(){
  if(radio_on_off==1){
   if(digitalRead(SW)==0){i_radio++;if(i_radio>13){i_radio=0;}start=1;f_radio = k[i_radio]; delay(200);}


   if (newPosition != oldPosition){oldPosition = newPosition;if(newPosition>1){newPosition=1;}if(newPosition<-1){newPosition=-1;}
     start=1; f_radio=f_radio+newPosition*10;newPosition=0;start=1;}

   if(start==1){radio.setBandFrequency(FIX_BAND, f_radio);delay(200);start=0;}
  }
  }

void to_Timer(){newPosition = myEnc.read()/4;}вот что у меня выводится в порт
радио работает?
щас усилитель подключу,и напишу
Нет,тишина
Когда я запускаю тестовый скетч из библиотеки все работает. Вот скетч
///
/// \file  TestRDA5807M.ino
/// \brief An Arduino sketch to operate a SI4705 chip based radio using the Radio library.
///
/// \author Matthias Hertel, http://www.mathertel.de
/// \copyright Copyright (c) 2014 by Matthias Hertel.\n
/// This work is licensed under a BSD style license. See http://www.mathertel.de/License.aspx
///
/// \details
/// This sketch implements a "as simple as possible" radio without any possibility to modify the settings after initializing the chip.\n
/// The radio chip is initialized and setup to a fixed band and frequency. These settings can be changed by modifying the
/// FIX_BAND and FIX_STATION definitions.
///
/// Open the Serial console with 57600 baud to see the current radio information.
///
/// Wiring
/// ------
/// The RDA5807M board/chip has to be connected by using the following connections:
///
/// | Signal       | Arduino UNO | ESP8266 | ESP32  | Radio chip signal |
/// | ------------ | ------------| ------- | ------ | ----------------- |
/// | VCC (red)    | 3.3V        | 3v3     | 3v3    | VCC               |
/// | GND (black)  | GND         | GND     | GND    | GND               |
/// | SCL (yellow) | A5 / SCL    | D1      | 22     | SCLK              |
/// | SDA (blue)   | A4 / SDA    | D2      | 21     | SDIO              |
///
/// The locations of the signals on the RDA5807M side depend on the board you use.
/// More documentation is available at http://www.mathertel.de/Arduino
/// Source Code is available on https://github.com/mathertel/Radio
///
/// ChangeLog:
/// ----------
/// * 05.12.2014 created.
/// * 19.05.2015 extended.

#include <Arduino.h>
#include <Wire.h>

#include <radio.h>
#include <RDA5807M.h>

// ----- Fixed settings here. -----

#define FIX_BAND RADIO_BAND_FM  ///< The band that will be tuned by this sketch is FM.
#define FIX_STATION 10370        ///< The station that will be tuned by this sketch is 89.30 MHz.
#define FIX_VOLUME 10           ///< The volume that will be set by this sketch is level 4.

RDA5807M radio;  // Create an instance of Class for RDA5807M Chip

/// Setup a FM only radio configuration
/// with some debugging on the Serial port
void setup() {
  delay(3000);
  // open the Serial port
  Serial.begin(115200);
  Serial.println("RDA5807M Radio...");
  delay(200);

  // Enable information to the Serial port
  radio.debugEnable(true);
  radio._wireDebug(false);

  // Set FM Options for Europe
  radio.setup(RADIO_FMSPACING, RADIO_FMSPACING_100);   // for EUROPE
  radio.setup(RADIO_DEEMPHASIS, RADIO_DEEMPHASIS_50);  // for EUROPE

  // Initialize the Radio
  if (!radio.initWire(Wire)) {
    Serial.println("no radio chip found.");
    delay(4000);

  };

  // Set all radio setting to the fixed values.
  radio.setBandFrequency(FIX_BAND, FIX_STATION);
  radio.setVolume(FIX_VOLUME);
  radio.setMono(false);
  radio.setMute(false);
}  // setup


/// show the current chip data every 3 seconds.
void loop() {
  char s[12];
  radio.formatFrequency(s, sizeof(s));
  Serial.print("Station:");
  Serial.println(s);

  Serial.print("Radio:");
  radio.debugRadioInfo();

  Serial.print("Audio:");
  radio.debugAudioInfo();

  delay(3000);
}  // loop

// End.Не вижу причин почему не работает, тот скетч который Вы опубликовали у меня не компилируется, похоже библиотеки разные.
Вот библиотека которую я использую - Библиотека Radio — http://rcl-radio.ru/wp-content/uploads/ … /radio.zip
#include <Wire.h>
#define CLK    8 // CLK ENCODER
#define DT     7 // DT  ENCODER
#define SW     6 // SW  ENCODER

#include <radio.h>
#include <RDA5807M.h>
#include <Encoder.h>
#include <MsTimer2.h>

#define FIX_BAND    RADIO_BAND_FM
RDA5807M radio;
Encoder myEnc(CLK, DT);

long times,oldPosition  = -999,newPosition;
int k[14]= {8750,8830,8910,8950,9120,9160,9360,9520,9800,9960,10120,10210,10370,10570};
bool radio_on_off=1;
bool start=0;
int i_radio, f_radio;

void setup() {
  Serial.begin(9600);
  Wire.begin();
  MsTimer2::set(1, to_Timer);MsTimer2::start();
  radio.init();
  radio.debugEnable();
  radio.setVolume(15);
  radio.setMono(false);// true - MONO
  radio.setMute(false);
  f_radio = k[0];
  radio.setBandFrequency(FIX_BAND, 10370);
  delay(400);
}

void loop(){
  if(radio_on_off==1){
   if(digitalRead(SW)==0){i_radio++;if(i_radio>13){i_radio=0;}start=1;f_radio = k[i_radio]; delay(200);}


   if (newPosition != oldPosition){oldPosition = newPosition;if(newPosition>1){newPosition=1;}if(newPosition<-1){newPosition=-1;}
     start=1; f_radio=f_radio+newPosition*10;newPosition=0;start=1;}

   if(start==1){radio.setBandFrequency(FIX_BAND, f_radio);delay(200);start=0;Serial.println(f_radio);}
  }
  }

void to_Timer(){newPosition = myEnc.read()/4;}всё, завелся
forum.rcl-radio.ru → Примеры кода → управление драйвером жк lc75823
Форум работает на PunBB, при поддержке Informer Technologies, Inc
|
|